Configure a Trigger for a Table

Prerna
Last Update há 2 anos
What is this article about?
- Learn how to create a Trigger, to automate specific actions whenever an object meets your predefined conditions
Who is this article for?
- Account admins and users with the AddOn Permission to create Triggers
Introduction
Triggers help streamline operations by automatically handling repetitive tasks or responding to events, reducing the need for manual intervention and increasing efficiency in logistics processes.
This guide will walk you through the configuration of an exemplary trigger that sends an email notification when the ETA of a transport order is postponed. (Keep in mind that an email template has to be created first, before the email dispatch can be automated via a trigger.)
For more insights into the concept of triggers, we recommend the following articles:
- Introduction to Triggers provides an overview of the trigger function and common use-cases.
- All Conditions in Triggers explains the different evaluation options that ensure the correct timing for a trigger to run.
- All Actions in Triggers focuses on the available actions that can be automated through a trigger configuration.
Step-by-Step Guide
Step 1: Navigate to Triggers
Open the table for which you want to configure the trigger and select 'Triggers' from the toolbar under the 'Home' menu:

This opens a list of all existing trigger configurations, if any, for the selected table. Now click on the 'Create New' button on the top right side of the page to begin the configuration.

For your new configuration, add a trigger name and description. Ensure that each configuration name is unique.
The 'Enable' toggle determines whether the trigger is set to active or inactive, that is, whether it would run or not. This is useful when you do not want to delete an automation but keep it inactive for a while:

Step 3: Configure Trigger Conditions
To ensure the correct timing for an action to run, start by selecting the appropriate trigger evaluation option. For detailed explanations of these, please refer to 'All Conditions in Triggers'.
To execute an action in case an ETA change is received for a transport order, select the condition 'Row updated' and the evaluation 'Whenever the change matches the conditions':

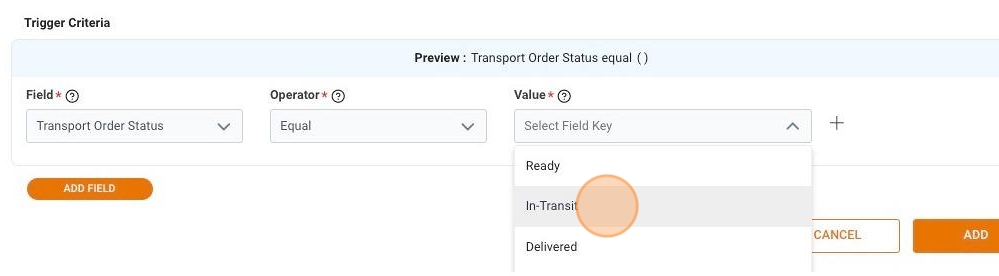
You now define the conditions that have to be met by the object. These follow the format 'field-operator-value'.
If several rules are configured, these are connected via an 'And' operator, which means, actions will only be executed for objects that meet all the conditions.
The following condition limits actions to objects with the transport status 'in transit':
After adding one criteria, click on the 'Add Field' button as shown in the image below to add the next criteria:

For our exemplary use case, two table fields have to be compared within one trigger criteria. For this purpose, after selecting the first field and operator, click on the 'plus' button next to the value input box as shown below:

This will create additional input boxes that allow you to compare the selected field with another one, as follows:
- Conditional Field - select the second table field you wish to compare the first field with.
- Field Operator - select additional math operation to set conditions while comparing the two table fields.
- Fixed Value - numeric value to support the mathematical condition between two table fields.
To trigger an action whenever an ETA is postponed by more than 3 days, we use the 'Previous ETA' as a conditional field, and set operator and value to 'Plus' '3':

Once you have added all the criteria for your trigger configuration, click on the 'Add' button on the bottom right:

Now you can add one or more actions that shall be performed whenever an object matches the conditions.
Step 4: Configure Trigger Actions
Once you completed your trigger conditions, you can select an action from a variety of options. For our example, we click on 'Send Email', which will open a dedicated configuration page:

Start by giving your action a clear, descriptive name. Next, select one of your predefined email templates to specify the message that will be sent whenever the trigger conditions are met.
If the selected email template already includes the recipient's email address, it will automatically populate the 'To' field. Alternatively, you can manually enter one or more recipients directly:

You can now define a Schedule, to plan your action for a predefined time or in relation to another date field within your object.
By default, the Schedule option will be set to 'Disabled', which means that the action you defined will be executed, the moment the trigger conditions are met.
You can now click on the 'Add' button on the bottom right to save the action.

This will take you back to the actions list, where you may add as many additional actions as needed.
When you are ready to save your trigger configuration, use the 'Save' button on the bottom right:

This will take you back to the list of all triggers that have already been configured for the selected table. For each trigger configuration the following information and actions will be available to you:
- The trigger name and description
- An indicator if the trigger is active or disabled
- Links to edit, duplicate and delete the trigger configuration

That's it! You have successfully configured a trigger to automate email notifications in case of ETA changes!
If you have additional questions, please do not hesitate to reach out to us at: [email protected]