Configure an Email Template for a Table

Prerna
Last Update hace 2 años
What is this article about?
- Learn how to configure templates, so you and users can send out standardized emails directly out of the Platform with just a few clicks
Who is this article for?
- Account admins who customize and manage the Logward Platform on behalf of their organization
- Platform users with the permission to create email templates
Introduction
Before diving into a step-by-step guide, here are some general facts about setting up email templates and sending emails from your Logward account:
- You do not necessarily need templates to send emails out of the Platform, but they enable you to send emails faster and in a standardized format across and outside your organization.
- You create an email template from and for one specific table in your account. That means, a template cannot be shared among different tables.
- You can create email templates for any and all tables in your account, and of course, you can set up as many different email templates for one table, as you and your users need.
Other users in your account can edit email templates, if their role includes the Add-on Permission to create email templates, but only for those tables for which they also have access permission.
Step-by-Step Guide
Step 1: Access the Email Template configuration
Navigate to any table in your account and click the Edit-button in the menu bar on top of the list view.
In our guide, we've chosen the table "Purchase Orders", for which we will set up an email template to inform of a changed Cargo Readiness Date (CRD):

Inside the Edit menu, click on the icon "Configuration", which leads to all the table level features that can be configured (keep in mind that some may be locked for, depending on your role's permissions):
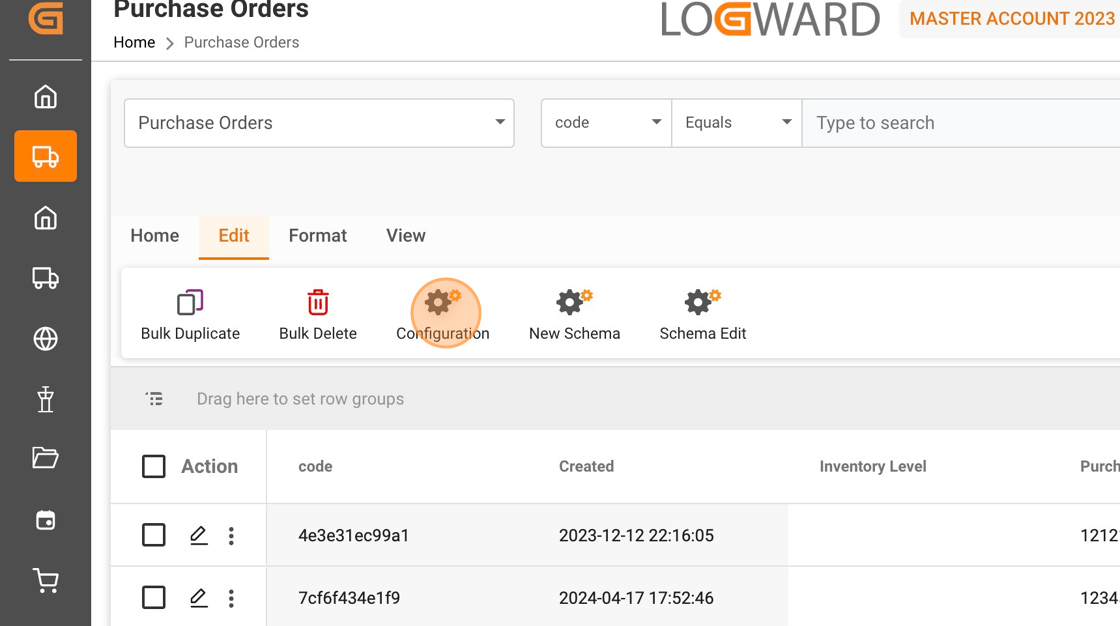
Now select the configuration "Email", to start setting up your email template:

Step 2: Start setting up a new Email Template
Going forward, this view will hold all email templates that have already been created for the particular table, so you can review and edit them as needed.
To create a new template, click on the "ADD" button on the right top corner. This will open a page where you can start configuring a new email template.

Click the "Enter title here" field to give name to your email template. For our guide, we call it "New CRD" as the title.
From the Role Type, you can multi-select roles who should have access to use this new template. By default, a new template is accessible to "All" roles.

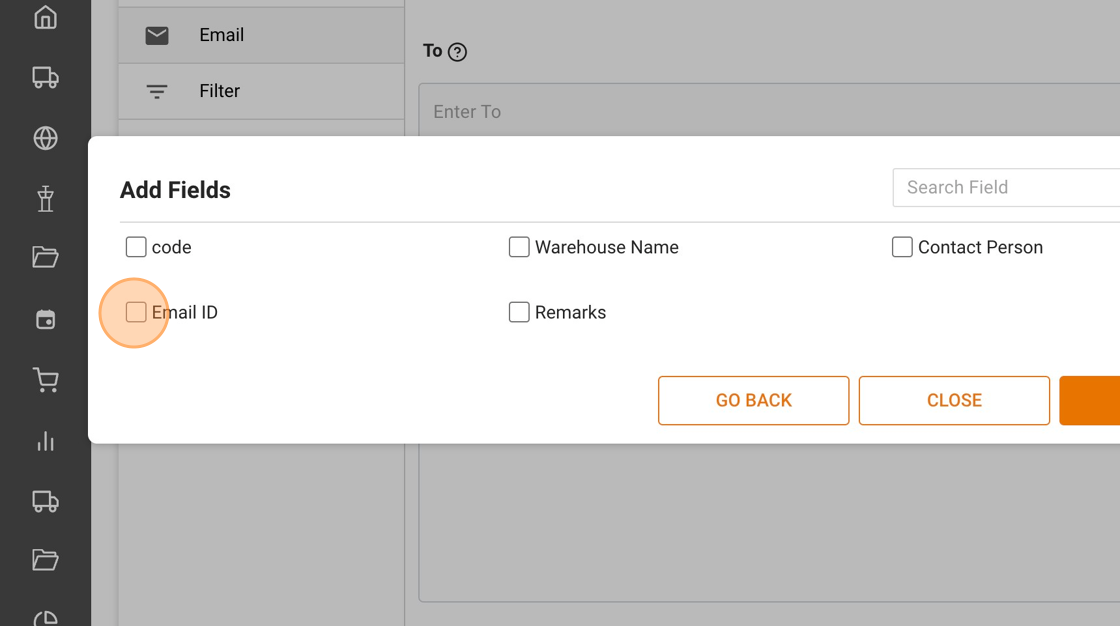
The email template configuration allows not only drafting an email body for faster and standardized emails. You can also pre-define the recipients by adding email addresses, already. To do so, click on the "+" icon on the right side of the "To" input box:

This will open a pop-up that lists fields from the table, for which you set up your template. For our guide, we select "Bill To":

In our example, "Bill To" is a lookup, which means that these fields belong to another table but have been linked to the Purchase Order table, so we can access and select them here, too. This allows us to directly derive the buyer's email address from a separate table with customer information.
After selecting the "Email ID" and clicking "APPLY", we can be sure that the correct recipient of the new cargo readiness date will be preselected in the future.
Note: Even if your email template is pre-selecting email addresses to save time, you can still edit the "To" input box, when using the template to send an email.

Step 3: Configure a subject and email body
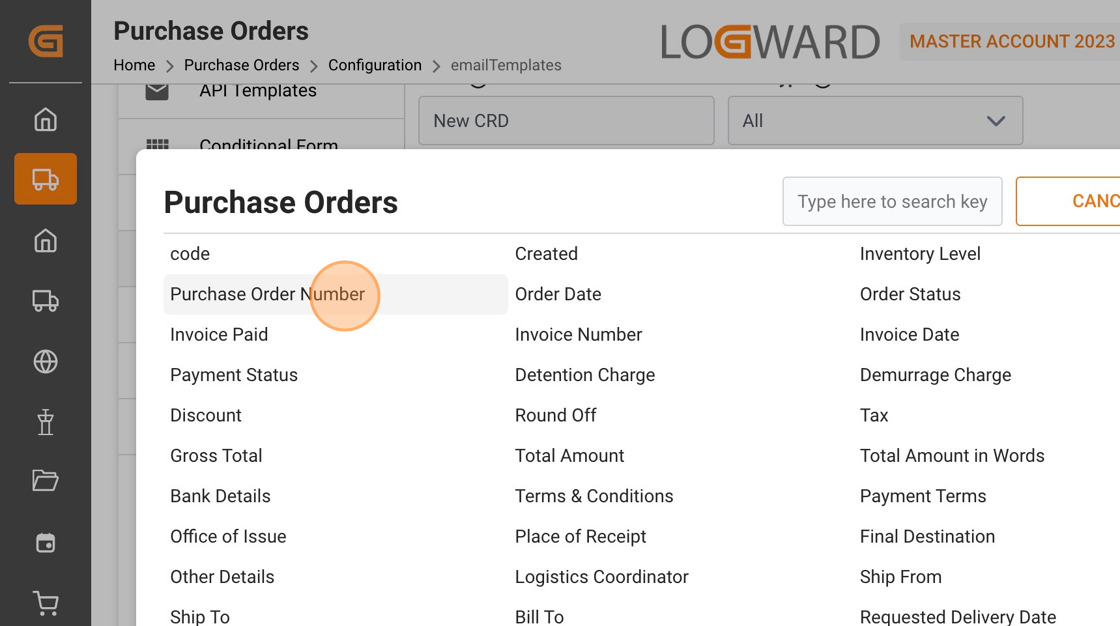
Click into the box "Enter subject here" and type your subject line.
Additionally, you can include fields from your table, which will reflect dynamic content, once your emails are being sent.
To do so, click on the "+" plus sign on the right side of the subject line.
For our guide, we select the "Purchase Order Number":

Now you can start typing the email body for your template. Of course, we support richt-text editing, so you can style and format the text to your liking, using the tool bar on top of the email body.
Similar to the "To" and "Subject" input box, you will find a "+" plus icon in the tool bar to add as many table fields to your email, as needed:
can select as many fields from the same table or any linked table, as you like:

Via the "+" plus sign you can also define, if documents that belong to objects in your table shall be attached to your future emails, and prepare a signature using user information:

Step 4: Save your email template
Once you are satisfied with the email draft and formatting, don't forget to click the "SAVE" button. You will receive a success message on save, and your template will be ready to be used!

You can configure unlimited email templates for each data table to speed up and standardize email dispatch.
And now, feel free to check our guide on 'How to Send Emails' to locate the email function within your Logward account!
If you have additional questions, please do not hesitate to reach out to us at: [email protected]